Don’t let Zombie EC2 instances run wild!
When I tried to explain what I do these days to my relatives, I’ve tried to make a correlation and say something like “you know you watch Netflix? That’s powered by the cloud”, so the obvious reply always is “ so how do they manage to store all these movies? They must have infinite capacity?”. Yes and no, right? While public cloud does provide the ability to easily and cheaply spin up new instances whenever you need them, with great power comes great responsibility. Almost every customer we’ve spoken to are leveraging Terraform/Ansible/CloudFormation or some kind of automation to orchestrate the provisioning and deploy process This means they can easily create repeatable deploys, and there are fewer snowflakes floating around.
What we also find is in most organizations developers are adept at spinning up resources and bringing applications online. However, bringing them down in a timely manner seems to be where most dev/test environments and hence the proliferation of “zombie” resources seem to occur. You’ll be surprised how many instances, Elastic IP’s, EBS volumes we end up finding that are nicely sitting in the AWS account and racking up the bill. None of the monitoring, observability systems pick these or report on them.
In this blog, we’ll explore a few items:
- Identifying Zombie instances in AWS
- Setting up a policy to properly report on these instances
- Create remediation steps either using an automated approach with an approval workflow
Identifying Zombie instances in AWS
Let’s start with something super simple and straightforward, we just want to get a list of instances that are stopped. You may be wondering why I’m describing a stopped instance when AWS says we’re not billed for the instance. While that is accurate, we’re still paying for the EBS volume, we’re also billed for each second, with a one-minute minimum, that we keep the instance running, even if the instance remains idle and we don’t connect to it. Refer to the AWS Instance lifecycle to get more information on this.
So how we get this list when the AWS EC2 Instances console doesn’t show us all instances across all regions? Well, we can script this using the AWS CLI or we can do this using CloudHealth by VMware to do this and much much more. Depending on how quickly you want to do this and skillset of the operations teams, scripting may/may not be feasible. A multi-cloud platform like CloudHealth by VMware might be your friend in some Zombie fighting that we’re about to embark on.
To identify all stopped instances, across all regions and all accounts, its as simple as browsing to Assets > AWS and then filtering through a few options as you see below.
We have the ability to get granular in our search if you chose to, by further filtering down by a time-period, identifying resources which have tags or not.
In a few easy steps, we can see a few instances that have been left in the stopped state by our friend Sean when he was testing Cloud9. Though the CloudHealth platform, I also have the ability to Start/Stop the EC2 Instance or run a Lambda function. Given, I have him on Slack,I might just ping him and ask what do with these!
So lets get into something a little more complicated and look into automated triggers.
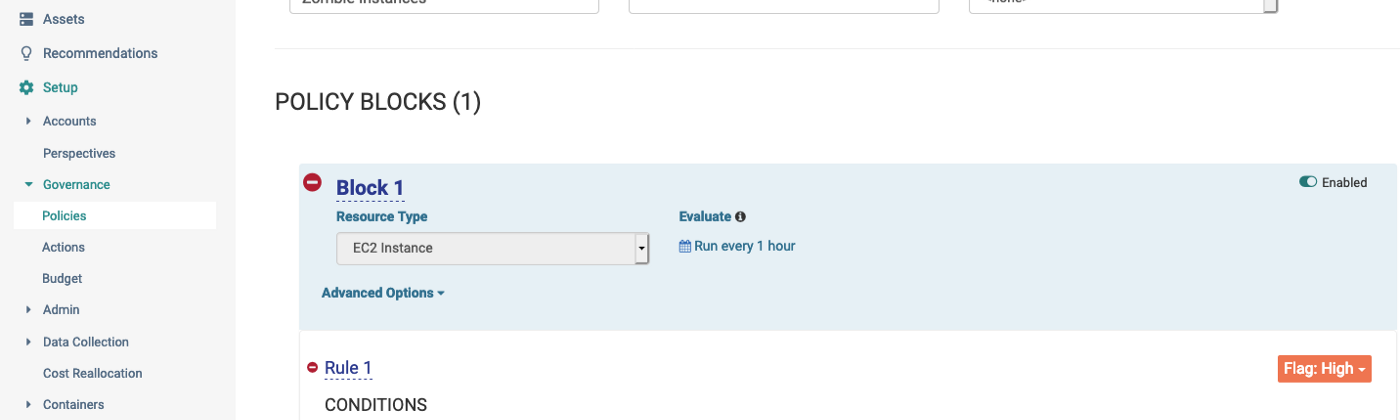
Setting up a policy to properly report on these instance
One of the areas, I’ve been exploring in CloudHealth are the Governance policies. Browse to Governance, under Setup and click on Policies. The final state of the required policy is show below. The policy is set to run every hour, looking for EC2 instances where maximum CPU is less than 5% for at least 14 days in one of the all AZ’s in one of the regions (Canada in this example).
Let’s dig into the components, especially the rule and action pieces to see how we came up with this exactly.
To setup this policy block, we have several options to chose from as you see above. We’re interested in the performance metrics, so we chose Performance. Under the measure tab, we have several options we can pick from. We’re going with CPU % to keep things simple.
The condition tab, allows us to slice and dice the match condition in ways that are amazing. The match condition can be based on AWS Accounts, Instance Types, OS, Perspective (which we’ve discussed previously) or based on Availability Zones.
Once we’ve defined the Block, and match condition, we need to define what action we’d like to implement. We have the option to implement an approval based workflow like Bahubali Shetti described for Proactive policy management of RDS instances.
Deleting the EC2 instances even with approval seems like an extreme step to me personally. I’d like to snapshot and then delete the instance just to be sure. Now, that is something we can implement using a Lambda function. We also can simply email ourself or even better email the owner to go and take action.
Don’t forget to hit Test Rule to make the rule is actually taking effect and finding resources! Once again we see two instances that were not cleaned up. The projected cost is ~$10/month, that’s ~$120 a year. Scale that to a large team and across your entire AWS environment, now we’re getting into some serious savings.
So finally, how does this look in an alert? Well, we get a nice email with a CSV file with all the resources that were identified.
Remediation steps either using an automated approach with an approval workflow
So now that we’ve identified these zombie resources, lets see how we can create a simple out of the box automated remediation with an approval workflow.
As described above, we leverage the Stop EC2 Instance action using the myself as the approver of the action. We also have the option to leverage our friend the Perspective Group option to also limit the scope of this action. If you haven’t used Perspective’s yet, I would highly recommend you start looking into it!
Once the action is evaluated, we get an email similar to what we see above, except this time around, we have the option to “authorize” the actions as you see below.
Once we click on the instructions, we get an option to authorize and provide the Access Keys/Secret Keys for the account we wish to execute the operations on. If you’re worried about the sharing the Access Keys/Secret Keys, they are never passed to the CloudHealth service. We leverage Amazon AWS support for Cross Object Resource Sharing (CORS) to request a set of temporary security credentials from AWS Security Token Service and that token in turn is used to execute the action on your behalf.
Remediation leveraging Lambda function
However, the above response we showed is a rather simplistic approach to the issue. In reality, we’d ideally want to snapshot the EBS volume before we power down the instance and eventually terminate if we don’t get any indicators that the instance was being used. We’ll describe in the next few steps how you’d go about building a multi-step action workflow. The steps at a high-level we’d like to invoke are:
- A lambda function to snapshot the instances that have been found to match the criteria defined. We have the option to leverage authorization if we’d like to, but since we showed it above, we’ll skip on this one.
- Wait for 5 mins to ensure the function completes
- Stop the EC2 instances and lastly,
- Send a Slack notification the #aws-cost channel so that the event is captured.
The lambda function we’re leveraging is shown below:
import sys
import botocore
import boto3
from botocore.exceptions import ClientError
from arnparse import arnparse

def lambda_handler(event, context):
    ec2 = boto3.resource('ec2', region_name='<
 >')
    ec2_client= boto3.client('ec2')
    lambdaFunc = boto3.client('lambda')
    print('Trying to get Environment variable')
    if event['resource_arns']:
        for item in event['resource_arns']:
            citem=arnparse(item)
            if citem.resource_type=='instance':
                ec2instance=str(citem.resource)
                try:
                    volumes=ec2_client.describe_instance_attribute(InstanceId=ec2instance, Attribute='blockDeviceMapping')
                    VolumeId=volumes['BlockDeviceMappings'][0]['Ebs']['VolumeId']
                    response = ec2.create_snapshot(VolumeId=VolumeId)
                    print('Success :: snapshotting', ec2instance)
                except ClientError as e:
                    print(e)
    else:
        print("No resources found")

return { 'message' : "Script execution completed. See Cloudwatch logs for complete output" }
The output from CloudHealth is the following form:
{
  "resource_arns": [
    "arn:aws:ec2:
:
:instance:
",
  ],
  "function_name": "ec2-testing-lambda",
  "region": "
"
}
Once the Lambda function is created in the AWS console, it takes ~15 mins for the function to be available in CloudHealth to be leveraged as an action. Once it is available, we can build out an action as shown below:
In summary, we leveraged some out of the box capabilities of the Cloudhealth platform to help identify and terminate zombie EC2 instances leveraging an automated approval workflow. This workflow will continue to run in the background and will certainly help in claiming back unused resources in an automated manner. Do you have other use-cases, you’d like to discuss? Feel free to drop a line below.