Using Armory Spinnaker to Deploy to VMware Essential PKS
Generally as I sit down to write a post such as this one, I sketch out an outline intended to introduce and provide some detail on a topic. In this instance, I can’t help but feel that I’m picking up somewhere in the middle. Thankfully, there is other existing work in this arena from the team. On the CloudJourney blog, you can find several pieces related to Continuous Integration and Continuous Development (CI/CD) technologies written by my colleague Tim Davis @vtimd, as well as a series I previously authored combining the core Jenkins offering from CloudBees and VMware Cloud PKS.
Spinnaker
Spinnaker is an open source, multi-cloud continuous delivery platform. The project began at Netflix, and is now a community governed and open source. Spinnaker is principally focused around two core pillars; application deployment and application management.
Spinnaker attracted the attention of our team as a deployment framework built around a modern and cloud friendly approach. I was first interested when I realized that its core concepts were application focused, and it natively supported both instance and Kubernetes based deployment strategies out of the box. As I was beginning to experiment with Spinnaker, our team made contact with a company working toward broader enterprise adoption of Spinnaker, Armory.io.
Armory.io
Armory is modernizing the way companies deliver software through an open source approach. They are a founding member of the Continuous Delivery Foundation, and are actively working on capabilities related to enterprise scalability, as well as contributing to the core open source Spinnaker project.
As I mentioned in the first paragraph, we’ll be starting in the “middle” of the story today. Rather than starting with the architecture and installation of Spinnaker (either the open source or Armory.io versions) I’ll be picking up from the point at which I connected a Kubernetes cluster to my Spinnaker instance as a deployment target. If you’re interested in a demo of Spinnaker, Armory hosts a demonstration environment here.
Adding a Kubernetes Spinnaker Account (Deployment Target)
After getting an instance of Spinnaker up and running, I began the process of deploying to my target environment by adding it to the Spinnaker configuration via my halyard container. In my case, the Kubernetes cluster in question is a VMware Essential PKS cluster deployed on top of AWS EC2 instances. Halyard is a command-line configuration administration tool for Spinnaker deployments. In this case, I ran Halyard as a docker container image using the following command:
docker run --name armory-halyard -it --rm \
  -v ~/spinnaker/.hal:/home/spinnaker/.hal \
  -v ~/spinnaker/.secret:/home/spinnaker/.secret \
  -v ~/spinnaker/resources:/home/spinnaker/resources \
  armory/halyard-armory:1.4.5
From this point, I entered the container via my bash shell docker exec -it armory-halyard bash.
Adding a kubeconfig and cloud provider to Spinnaker
From the halyard container’s bash shell, I configured a set of environment variables.
Note: The listed commands assume the current kubectl context of your shell is the cluster you intend to add as a deployment target
# Specify the name of the kubernetes context that has permissions in your target cluster and namespace
# to create the service account.  To get context names, you can run "kubectl config get-contexts" and select a specific value.
export CONTEXT=$(kubectl config current-context)

# Enter the namespace where you want the Spinnaker service account to live
export NAMESPACE="spinnaker-system"

# Enter the namespace that you want to deploy to.  This can already exist, or can be created. The values below are examples.
export TARGET_NAMESPACES=(namespace-1 namespace-2)

# Enter the name of the service account you want to create in the target namespace.
export SERVICE_ACCOUNT_NAME="spinnaker"

# Enter the name of the role you want to create in the target namespace.
export ROLE_NAME="spinnaker-role"

# Enter the account name you want Spinnaker to use to identify the deployment target.
export ACCOUNT_NAME="armory-test-target"
Ensure the namespaces listed in the above environment variables exist in the target Kubernetes cluster. If they do not, create them via the kubectl create ns {value} command.
For Spinnaker to be able to communicate to a Kubernetes cluster, it requires a kubeconfig file. The following procedure results in a pared down kubeconfig specific to an individual service account and token.
#################### Create minified kubeconfig
NEW_CONTEXT=${NAMESPACE}-sa
KUBECONFIG_FILE="kubeconfig-${NAMESPACE}-${CONTEXT}-sa"

SECRET_NAME=$(kubectl get serviceaccount ${SERVICE_ACCOUNT_NAME} \
  --context ${CONTEXT} \
  --namespace ${NAMESPACE} \
  -o jsonpath='{.secrets[0].name}')
TOKEN_DATA=$(kubectl get secret ${SECRET_NAME} \
  --context ${CONTEXT} \
  --namespace ${NAMESPACE} \
  -o jsonpath='{.data.token}')

# This is necessary to handle both OSX and bash base64, which have different flags
# Any errors on the first command can be ignored
TOKEN=$(echo ${TOKEN_DATA} | base64 -d)
if [[ ! $? -eq 0 ]]; then TOKEN=$(echo ${TOKEN_DATA} | base64 -D); fi

# Create dedicated kubeconfig
# Create a full copy
kubectl config view --raw > ${KUBECONFIG_FILE}.full.tmp
# Switch working context to correct context
kubectl --kubeconfig ${KUBECONFIG_FILE}.full.tmp config use-context ${CONTEXT}
# Minify
kubectl --kubeconfig ${KUBECONFIG_FILE}.full.tmp \
  config view --flatten --minify > ${KUBECONFIG_FILE}.tmp
# Rename context
kubectl config --kubeconfig ${KUBECONFIG_FILE}.tmp \
  rename-context ${CONTEXT} ${NEW_CONTEXT}
# Create token user
kubectl config --kubeconfig ${KUBECONFIG_FILE}.tmp \
  set-credentials ${CONTEXT}-${NAMESPACE}-token-user \
  --token ${TOKEN}
# Set context to use token user
kubectl config --kubeconfig ${KUBECONFIG_FILE}.tmp \
  set-context ${NEW_CONTEXT} --user ${CONTEXT}-${NAMESPACE}-token-user
# Set context to correct namespace
kubectl config --kubeconfig ${KUBECONFIG_FILE}.tmp \
  set-context ${NEW_CONTEXT} --namespace ${NAMESPACE}
# Flatten/minify kubeconfig
kubectl config --kubeconfig ${KUBECONFIG_FILE}.tmp \
  view --flatten --minify > ${KUBECONFIG_FILE}
# Remove tmp
rm ${KUBECONFIG_FILE}.full.tmp
rm ${KUBECONFIG_FILE}.tmp
With the kubeconfig in place, we can alter the halyard configuration and deploy it to the Spinnaker deployment:
# Feel free to reference a different location
KUBECONFIG_DIRECTORY=~/.secret/
cp ${KUBECONFIG_FILE} ${KUBECONFIG_DIRECTORY}
export KUBECONFIG_FULL=$(realpath ${KUBECONFIG_DIRECTORY}${KUBECONFIG_FILE})

# Enable the kubernetes provider - this is probably already be enabled, if Spinnaker is installed in Kubernetes
hal config provider kubernetes enable
# Enable artifacts; not strictly neccessary for Kubernetes but will be useful in general
hal config features edit --artifacts true

# Add account
hal config provider kubernetes account add ${ACCOUNT_NAME} \
  --provider-version v2 \
  --kubeconfig-file ${KUBECONFIG_FULL} \
  --namespaces ${NAMESPACE}

# Apply changes
hal deploy apply
Creating an Application in Spinnaker
Now that deployment target(s) have been configured via halyard, it’s time to login to the Spinnaker web UI (spin-deck). The exact method of access will depend on the way in which the Spinnaker instance was deployed. For information on exposing a Spinnaker deployment, please see this documentation.
Once the Spinnaker UI loads, you should see a very plain screen featuring a search bar and a horizontal navigation bar across the top of the screen. Click on ‘Applications’, which will take you to a similar screen featuring a table in the main panel. Navigate to the ‘Actions’ item on the right side of the screen and select ‘Create Application’ as seen in the image below.

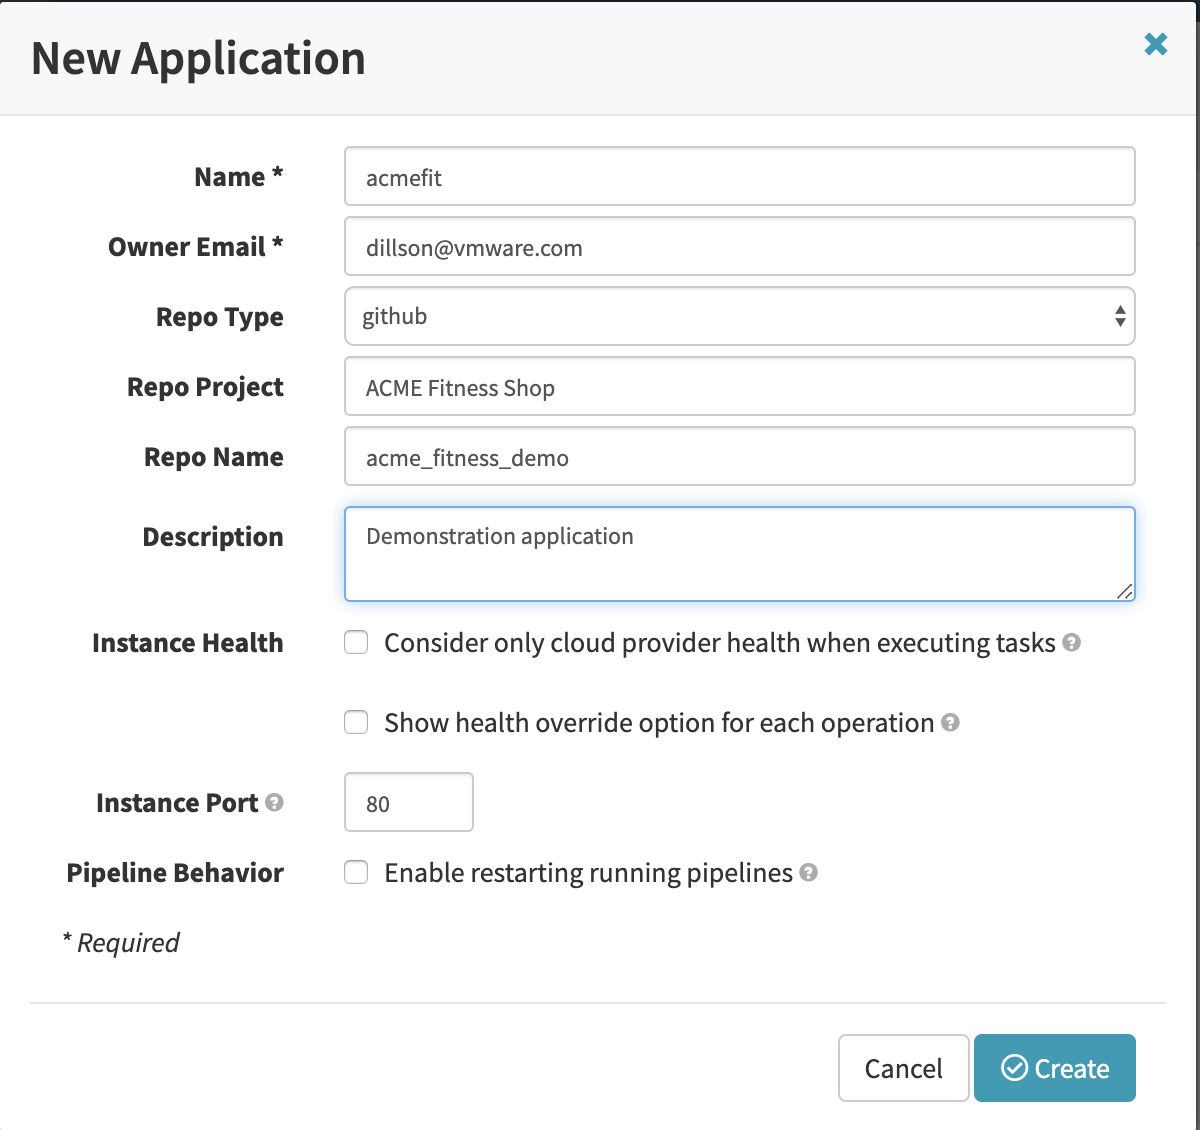
Selecting ‘Create Application’ will create a pop-up window for defining a new Spinnaker application. In this case, the code I used resides in a Github repository, so the appropriate ‘Repo Type’ has been selected. I then filled in the rest of the details as shown in the image below.
Setting up a Pipeline
With the ‘acmefit’ application created, the next step toward a first deployment is to conifgure a pipeline. To start, use the horizontal navigation bar across the top of the screen to select ‘Applications’. From the resulting table of applications, click on the name of the application deployed in the previous step. In this example, that application is ‘acmefit’.
From the application screen, select ‘Pipelines’ from the secondary horizontal navigation bar. Then use the indicated button to create a new pipeline as shown in the image below.

After giving the new pipeline a name (I used ‘acmefit-pipeline’) a detailed configuration page will be displayed. We’ll start by adding a stage to the pipeline in the visual configuration section. To illustrate this component, I created two stages based on the catalog and cart services (and their datastore) from the ACME Fitness Shop application. The configuration of a stage is based on the account to deploy to, the application in question, and the source of the kubernetes manifest file.
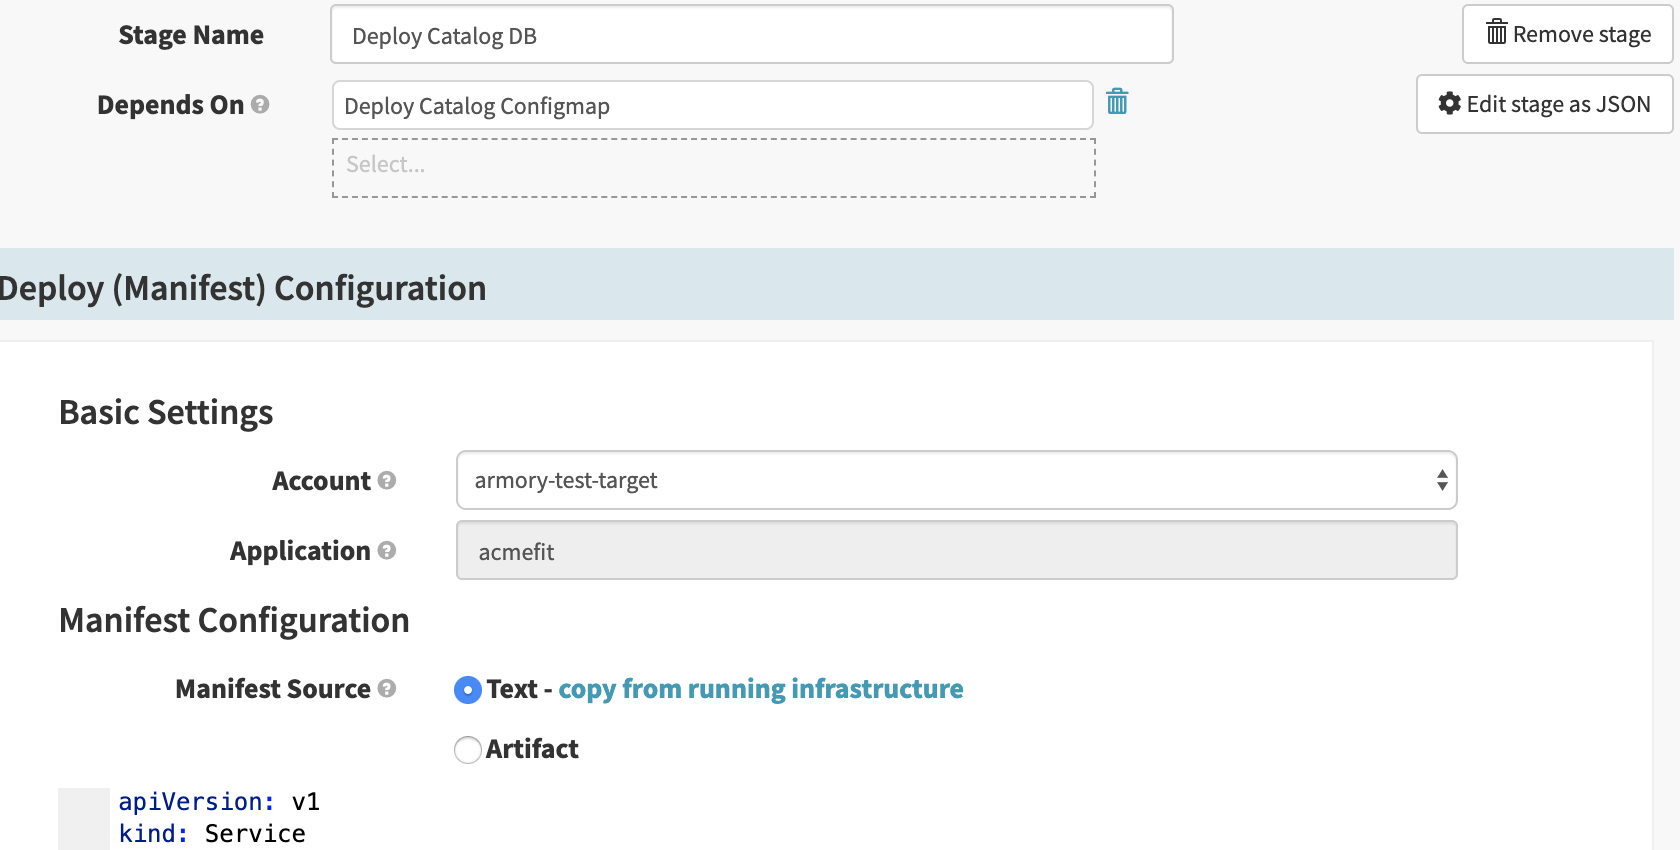
For the sake of simplicity, each of these stages was configured to deploy a Kubernetes manifest. The cart and catalog service deployments depend on their respective data stores, but not on each other.

For the full ACME Fitness Pipeline, additional ‘branches’ would be configured for the respective microservices. Optionally, individual pipelines could be defined per microservice and referenced as stages in a master pipeline. For more information on Spinnaker pipelines, feel free to consult the Armory or Spinnaker documentation sites.
Spinnaker is a powerful and flexible continuous deployment tool designed for modern applications and environments. It natively understands Kubernetes and can simplify the deployment process on upstream clusters such as those deployed by VMware Essential PKS. If you’re able to join us for the VMware {Code} meetup or view the livestream, please share your comments with us @cloudjourneyio.