Deploying Istio with helm on VMware Cloud PKS (formerly VKE) — Part 1 - Installation
Deploying and managing an application on Kubernetes, while easy in a single cluster configuration, becomes complex across clusters. Complexity surrounds not only deploying the application but also management capabilities, such as monitoring, security, scale, and inter-service connectivity across clusters.
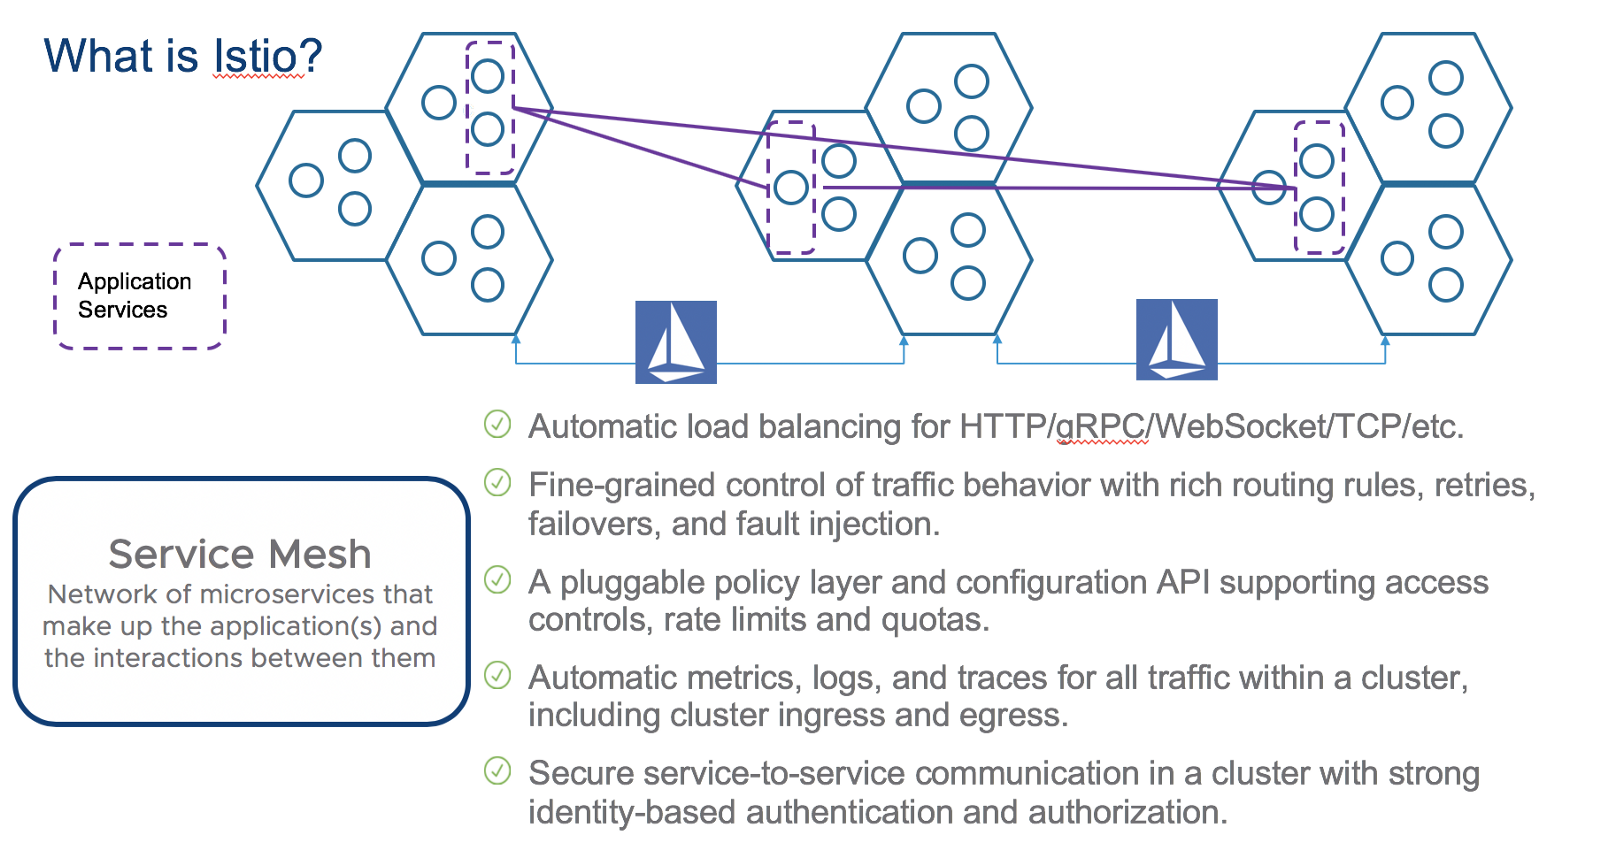
Istio, simplifies the operation of micro-service based applications across Kubernetes clusters by enabling the following capabilities:
- Traffic Management
Istio is designed to be part of the application deployment, through the use of a proxy per deployment. This proxy ensures enforcement of traffic rules, security policies and collects observability data (logs, metrics, tracing) from each deployment.
Once the application starts to scale, Istio will also scale, as long as proxies are deployed with each new replica. The interconnection of multiple micro-services with the appropriate traffic management, observability and security is what is called a Service Mesh.
Istio is a service mesh.
From Istio.io’s site, a service mesh is:
Service mesh is used to describe the network of microservices that make up such applications and the interactions between them. As a service mesh grows in size and complexity, it can become harder to understand and manage. Its requirements can include discovery, load balancing, failure recovery, metrics, and monitoring. A service mesh also often has more complex operational requirements, like A/B testing, canary releases, rate limiting, access control, and end-to-end authentication.
There are other service mesh options in the eco-system
- linkerd (CNCF)
- istio
- conduit
In this blog we will look at deploying Istio on VMware Cloud PKS as part of a simple application. I will explore the initial installation in this blog, and I will also cover managing the application with Istio in subsequent blogs.
- part 1 — (this blog) Proper installation with some specifics for VMware Cloud PKS
- part 2 — Initiating service mesh and properly configuring Istio Load Balancing
- part 3 — Exploring a race condition between Envoy and application deployments
Istio Architecture
Before we begin covering installation, its warranted to review Istio’s architecture to understand how Istio works in reference to the application. From the istio.io site:
There are two parts of the architecture:
- Data plane — Any and all communications between services is controlled by the “injected” proxy in each deployment. This proxy is called “Envoy”, developed by Lyft.
- Control plane— Is composed of three baseline components that help “control” and manage the service to service communications.
Envoy Proxy
No discussion of the architecture is complete with out describing the Envoy Proxy. Envoy proxy is the “heart” of Istio. Without it a majority of the features and capabilities would not be possible.
From the envoy.io site:
Originally built at Lyft, Envoy is a high performance C++ distributed proxy designed for single services and applications, as well as a communication bus and “universal data plane” designed for large microservice “service mesh” architectures. Built on the learnings of solutions such as NGINX, HAProxy, hardware load balancers, and cloud load balancers, Envoy runs alongside every application and abstracts the network by providing common features in a platform-agnostic manner. When all service traffic in an infrastructure flows via an Envoy mesh, it becomes easy to visualize problem areas via consistent observability, tune overall performance, and add substrate features in a single place.
What are the capabilities?
How is envoy.io deployed in the application?
Using my standard fitcycle app (https://github.com/bshetti/container-fitcycle), we can see where envoy fits in the application’s deployment.
Above we see the application (fitcycle) deployed in a Kubernetes cluster with several pods
Once envoy proxy is deployed it enables us to push down traffic management policies, support metrics to prometheus, push traffic and interconnectivity data to service graph, etc.
Helm Deployment of Istio
The best and simplest way to deploy Istio is to use helm. Helm is a package manager that helps you create, install and manage applications. Helm using a construct called “chart” that is a collection of Kubernetes yamls. This collection encompasses all aspects of the application: services, deployments, ingress rules, configuration mappings, etc.
More info on helm:
There are set of “stable” charts that people have created and managed on github.
Unfortunately, istio helm chart is NOT IN GITHUB under HELM. The istio helm chart is in the istio release it self.
Follow the steps outlined here to install Istio with helm:
Step 1 — Download latest release (I used istio1.0.0) https://istio.io/docs/setup/kubernetes/download-release/
Step 2 — Ensure your application meets the requirements outlined here: https://istio.io/docs/setup/kubernetes/download-release/
Before we get to Step 3 and beyond, we need to explore the proper naming of ports in your application’s service yamls and labeling of deployments.
    1)Named Ports in service.yaml:

    Service ports must be properly identified:
       <protocol>[-<suffix>]
       <protocol> = http, http2, grpc, mongo, redis
       <suffix> = anything you want or nothing

    Example:
      VALID: name: http2-foo or name: http
      INVALID: name: http2foo

    2) App and Version labels in deployment.yaml

    The following labels need to be consistent across all deployments with respect to the "app" label.
    Different variants of the deployments can have varying "version" labels.

    app: APPNAME
    version: v1
Here is an example of how to use the above rules followed in the fitcycle application:
api service service.yaml (see bold)
api service deployment.yaml (see bold)
Step 3 — Install helm
Follow the steps outlined in the “install from binary” section:
I installed v2.9.1 https://docs.helm.sh/using_helm/#from-the-binary-releases
Step 4 — Modify vales.yaml for VMware Cloud PKS
Since we are using VMware Cloud PKS we need to modify the values.yaml file for VMware Cloud PKS.
VMware Cloud PKS only allows use of nodeports in the following range: 30400–30449
The values.yaml file is found here:
~/istio-1.0.0/install/kubernetes/helm/istio/values.yaml
Here are the values that need changing in values.yaml (see bold)
Step 5 — install istio with helm
1-First install the appropriate istio credentials (if you are running helm prior to 2.10.0)
$ kubectl apply -f install/kubernetes/helm/istio/templates/crds.yaml
2-Second create the helm service account
$ kubectl apply -f install/kubernetes/helm/helm-service-account.yaml
3-Third init tiller with service account
$ helm init --service-account tiller
4-Forth install istio
$ helm install install/kubernetes/helm/istio --name istio --namespace istio-system
Istio Running
Once istio installation is complete, you will see the following:
Services:
This is what you should see for services:
Deployments:
This is what you should see for deployments:
Several key points:
- istio-system namespace is created and holds all the istio components
- prometheus is loaded by default
Injecting Envoy Proxy into the application
Injecting the envoy proxy on each service is simple. The proxy needs to be injected per deployment. (automatic injection is also possible, and I will describe this in another blog)
In my configuration of fitcycle, I have three services
- django based webserver
- flask based apiserver
- mysql database
I simply inject envoy into EACH deployment with the following command.
kube-inject -f api-server-deployment.yaml | kubectl apply -f -
To remove the proxy at any point, simply run
kube-inject -f api-server-deployment.yaml | kubectl delete -f -
Once the proxies are injected you can see their status as follows:
Summary
Now that envoy proxy is injected into the application, the installation of istio with the application is complete.
Here is what we accomplished:
- Installed helm
- Configured application to properly adhere to istio port and version requirements
- Configured security for helm and istio
- Installed istio
- Injected envoy proxy into application components
In the next blog, we will explore how utilize service graph and prometheus from istio, and configure load balancing.