Deploying a scalable MySQL Replication Cluster on Google Kubernetes Engine (GKE) with Bitnami
Deploying a scalable MySQL Replication Cluster on Google Kubernetes Engine (GKE) with Bitnami
Introduction
When you are designing a business critical application, one of the most important pieces is the database. Ensuring that your database is highly scalable, and resilient, is a critical step in the design for performance and to help protect against possible data loss.
There are several different ways to achieve this, including:
-
Hosted database services like Amazon Aurora, or Cosmos DB in Azure. These services are easy to get started with, highly scalable and resilient to data loss, but they typically lack deep customization options, direct log access or full system privileges.
-
You can also build your own cluster of servers and customize it to meet your scalability, high availability and data protection requirements. This gives you maximum flexibility and control, but requires a significant investment of time and resources to maintain, troubleshoot and upgrade the solution.
This article introduces a third option: the Bitnami MySQL Helm chart, which gives you a production-ready MySQL replication cluster on Kubernetes. Kubernetes provides built-in capabilities to monitor health and recover from process/node failure and scale out depending on your decisions about usage patterns. At the same time, the Bitnami Helm chart ensures that the cluster is configured according to current best practices for security and scalability, while still allowing a high degree of customization.
This guide walks you through the process of deploying a MySQL replication cluster on Google Kubernetes Engine, importing some test data, then testing replication. By relying on Kubernetes data storage services, this approach avoids a single point of failure, increases the resilience of your application and makes it easier to scale up in future.
Assumptions and prerequisites
This guide makes the following assumptions:
- You have a multi-node GKE cluster running.
- You are using the Google Cloud Shell to access the cluster. This ensures you have the tools you need already installed and ready to go.
Step 1: Deploy MySQL on Google Kubernetes Engine
The first step is to deploy MySQL on the Kubernetes cluster. The easiest way to do this is with Bitnami’s MySQL Helm chart. I used a modified version of the values.yaml file from the chart so that I could set the forcepassword value to true and set the password value to VMware1!
You can find my modified values.yaml file in this GitHub Repository. Place it in the working directory of your Google Cloud Shell.
Use the following commands to deploy MySQL on your GKE cluster, remembering to replace YOUR-DEPLOYMENT-NAME with the value you want to use.
helm repo add bitnami https://charts.bitnami.com/bitnami
helm install --name td-bitnami-mysql -f values.yaml bitnami/mysql --set service.type=LoadBalancer
These commands create a MySQL cluster with one master node and one slave node. The cluster will be auto-configured for replication and avbailable for access through the LoadBalancer service.
Wait for the deployment to complete and then run the command below to obtain the IP addresses for use with MySQL
kubectl get svc --namespace default | grep mysql
Here is an example of the output you should see:

Step 2: Test the cluster and replication
The next step is to confirm that you are able to connect to the new MySQL deployment, and test replication between the master and slave nodes.
-
Log into the Google Cloud Shell
-
At the console, use the command below to connect to the MySQL deployment. Replace the MYSQL-PASSWORD placeholder wih the IP address of the master node load balancer obtained in Step 1.
mysql -h MYSQL-PASSWORD -u root -p
Enter the password supplied at deployment-time when prompted to do so.
- At the MySQL prompt, use the command below to list available databases:
SHOW DATABASES;
Confirm that you see a new, empty database named my_database, which is created by the Helm chart deployment.
Once you have confirmed that your MySQL cluster is operational, the next step is to verify data replication between the master and slave nodes. Follow these steps:
- At the same MySQL prompt, use the commands below to create a new database table and fill it with some sample data:
USE my_database;
CREATE TABLE test (id INT NOT NULL);
INSERT INTO test (id) VALUES (21), (22);
- Confirm that the table and records have been created by checking the output of the following command:
SELECT * FROM my_database.test;
- Log out of the master node:
exit
- At the server console, connect to the slave node. Replace the MYSQL-SLAVE-PASSWORD placeholder with the IP address of the slave node load balancer obtained in Step 1.
mysql -h MYSQL-SLAVE-PASSWORD -u root -p
Enter the password supplied at deployment-time when prompted to do so.
- At the MySQL prompt, verify that the database table and records created on the master node are also available on the slave node:
SELECT * FROM my_database.test;
Here is an example of what you should see:
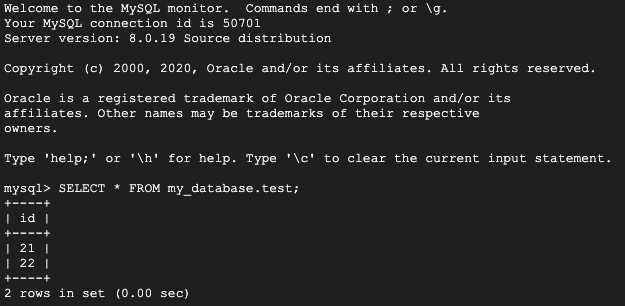
This implies that cluster node replication is operational and working as it should.
- Log out once done
Conclusion
As you can see, using Bitnami to deploy a scalable and resilient MySQL cluster on GKE makes things very quick, and easy. If you would like to take this a step further, and see how to integrate this database setup into a LAMP stack application, check out the second part of a similar article that uses MariaDB here.
Useful Links
To learn more about the topics discussed in this arble, use the links below:
- Bitnami MySQL Helm chart documentation
- Bitnami applications FAQ
- Bitnami documentation for Kubernetes deployments on different cloud platforms